Wednesday 31 October 2012

Poppy


Not really papercrafting but I spotted this idea on Pinterest and thought I'd give it a go.
 There are quite a few companies selling fancy poppies nowadays but the prices are pretty steep and they tend to only give a small fraction of the cost to the British Legion.

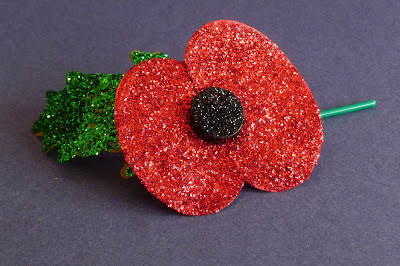
Bling your own poppy instead!


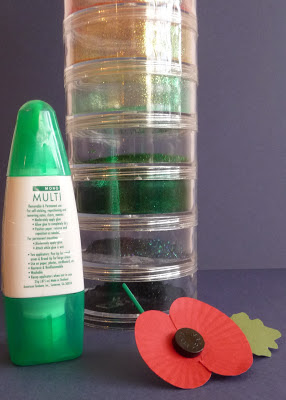
Buy a normal poppy and take it to bits.
Cover each part with a strong wet adhesive and roll it in some coloured glitter.
Voila!

The photo does not pick up just how sparkly this is in real life.


Tuesday 30 October 2012

Babies


Sentiment is a Basic Grey rub-on (just noticed that annoying wrinkle) and I even used the packaging for some matting and layering.


Saturday 27 October 2012

Joy and Cheer


Having been ill I'm struggling to get back into crafting at the moment so a very simple card here.

It's Cuttlebug embossing folder 'Joy and Cheer' and I've highlighted it with some Glamour Dust.
The snowflake is a brad I've had in my stash for about a decade.

The ribbon looked very flat and limp and I wanted it to curl.
I wrapped it around a pencil and blasted it with my heat gun for about ten seconds or so and this seems to have done the trick. In future I'll try and remember to use a couple of strands of ribbon if doing this as it doesn't look very full whereas when it was straight it was enough for the card.


Thursday 25 October 2012

Peace, Love, Joy


Bit of an extended absence due to the flu!
Main panel is by Kaisercraft
Metal snowflake is Making Memories
Pearl button by the Hobby House


Monday 15 October 2012

No Card Today

Usually I try to update this blog every other day. Currently we are re-decorating, the house is covered in dust, and I have no time for card-making :(

Hopefully normal service will be resumed in the next couple of days!

Friday 12 October 2012

Celebrate


Quick and simple!
Embossing folder is by Cuttlebug
Sentiment is a Paper Smooches stamp
Twine by Queen & Co


Wednesday 10 October 2012

Mum


Paper is Papermania, card is 8 x 8 inches
Flowers are Prima
Die is by Quickutz
'MUM' cut with Cricut Base Camp
Whole lot sprayed with shimmer paint


Monday 8 October 2012

Families


Sticker is DCWV
Papers are Fancy Pants


Saturday 6 October 2012

Box


Grrrrr, so I figured out the measurements for a box to hold a 230g bar of Dairy Milk....and Cadbury's have changed the size to 200g.
I'm sure it won't make any difference to the box dimensions but annoying that they think customers won't notice there is less chocolate!


So I made a smaller box to hold a different manufacturer's chocolate bar.


The box is made the same way as the one I showed the other day, just change the measurements slightly and it will hold 'ChokaBlok' 100g bars instead of Dairy Milk. The Dairy Milk boxes are made with a single piece of 12 x 12 whereas this one uses a piece of A4.


I find it easier to buy something (chocolate!) and then build a box to fit rather than make a box and have to search for something to go in it.
I use a Martha Stewart scoreboard if I want imperial measurements and a Stampin' Up board on the top of that if I want metric. So for bars of chocolate I lay them on some scrap paper, on top of the scoring board, and roughly score around the bar, from there I can work out approximately what the actual measurements are.


 For 'ChockaBlok' 100g box:  

Take a piece of A4 card-stock, stamp a pattern randomly if wished.
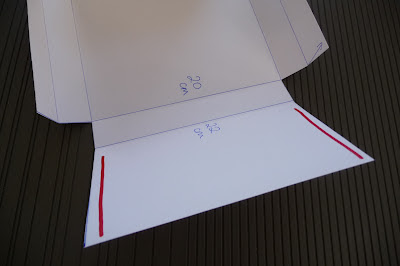
Score at 2cm and 4cm along each side as shown above
Spin the card-stock round so it is landscape and score at 7cm, 9cm, 20cm and 22cm

Cut away each corner and fold all score-lines inwards.


Add a line of glue or ultra-sticky tape as shown in red above.
Assemble box and tie closed with ribbon and tag.

Thursday 4 October 2012

Winter Wishes


Image is by Tilda.
Doily (chopped up) is by Dovecraft
Gingham layer is made with washi tape, magazine freebie.


Wednesday 3 October 2012

Adhesive Bargain


I don't normally pay much attention to adverts in card-making magazines but recently one caught my eye.

A company was advertising bumper packs of assorted adhesives for £9.98. I'd never heard of the company but had a look at their website and decided to take a chance.
The kit looked such good value I thought I ought to get two and thus take advantage of free p&p.

I ordered on Sunday and the two kits arrived this morning, this is what one kit looks like;


I use a lot of 'red-liner' tape when making boxes and have paid £3 for one roll in certain craft shops, this has eight rolls. I would have been happy with just those and the non-stick craft mat so everything else was a real bonus!

Here's a link to the company concerned. I have absolutely no connection to them whatsoever and am not being paid to advertise. I will also say that I have not yet had time to actually use any of the products so fingers crossed that the quality is okay.

Tuesday 2 October 2012

Shaker


The first couple of years after I started card-making I had to try every new technique and trend. I was a very regular visitor at my local craft shops they must have seen me coming and got sucked into buying things that with hind-sight I really shouldn't have.
Spirelli, decoupage, accordian cards, iris-folding, tea-bag folding, one of those Fiskars shape-cutters that everyone else hated too.
And shaker cards.

I really liked the idea of shaker cards but mine always looked a bit boring: they were okay when being shaken but the rest of the time (ie 99% of the time) they were just sad.

The other day I got it into my head that I should have another go at shaker cards, no idea why, I must have been ill.
So I gave it a go but hopefully have now got it out of my system and won't attempt another one for the next decade or so.


Snowflake frame is a Sizzix die
Stamp is by Woodware
Card is midnight-blue pearlescent . I've filled the shaky bit with Diamond Dust and some Bedazzles.