Thursday, 19 December 2013
Tuesday, 17 December 2013
Mum & Dad
Silky crush ribbon and snowflake embellishment are from Chloe's. I used 'invisible' mending thread to sew the snowflake on to the ribbon as it's quite heavy.
The bird/ bauble laser-cut is from Hobbycraft. I wasn't sure if I liked the original off-white colour so smooshed a Versamark ink-pad over one and added some gold embossing powder.
I then tried another version that used two coats of ink and powder to see if I could get a smoother finish, this worked except the laser-cut lost a little bit of definition.
The scallop die is Spellbinders and the alpha is Sizzix Script.
The card is 8 x 8 inches.
Labels:
Christmas,
die-cut,
Hobbycraft,
Sizzix alphabet,
Spellbinders
Thursday, 12 December 2013
Lili
Very simple one today, I'm busy with Christmas stuff.
At some point this will get a sentiment stuck on, image is Lili Of The Valley.
Tuesday, 10 December 2013
Sunday, 8 December 2013
Tuesday, 3 December 2013
Merry
Last week at card club someone casually mentioned they would be going to visit a mutual friend. I asked if they would be going before Christmas and they replied "Yes, but if want me to take a card then you'll need to give me it today".
I literally had minutes to design and make a card, with what I had with me, hate being put on the spot like that!
This was the very quick card that I threw together. The holly die is an old Sizzix one and the sentiment is by Papertrey Ink. The sentiment has been cut twice and layered up to add some depth.
I thought it was quite good for an 'instant' card but had a couple of comments along the lines of "Why are you just putting merry?"
Well that's because I don't have a Christmas die....
When I got home, with more supplies, I decided to make the same card but this time to add some glitter (the first one is glazed with Glossy Accents).
Then made a landscape version and went mad and added a peel-off, woohooo.
Sunday, 1 December 2013
Advent Calendar
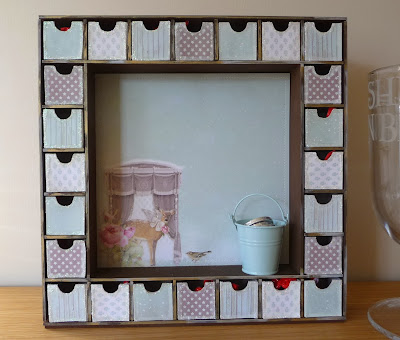
I bought this Kaisercraft advent calendar kit months ago.
I think it was September before I took it out of the packet, then took ages painting it all. The instructions I read said it would need two coats but I gave it three and still wasn't happy with the finish (but was extremely bored of painting by then)
Assembly was straight-forward enough but I was concerned as to whether the MDF would have swollen with the paint and then not fit properly.
After all this I read a blog post where someone suggested assembling it all first and then simply spray painting the whole lot....yeah, wish I'd read that before I started!
The calendar had been sitting about for a few weeks because, although I'd painted it dark brown, I had no idea how to decorate it.
I was hoping that the shops would start getting their Christmas decorations in and that it would inspire me.
Then, last week I realised it was December 1st (today) and that I needed to crack on else there would be no point at all in having an advent calendar.
I am a fan of the Tilda range of papers so eventually decided to use a combination in duck-egg/ brown.
I'm ashamed to say the calendar is still not complete but I have put some chocolates in anyway and it is nearly done ...
I need to number all the boxes (but don't like the huge numbers that come with the kit) and also I want to do something with the big area in the middle.
Maybe by next Christmas I'll have it done :)
Subscribe to:
Comments (Atom)


