Thursday, 19 December 2013
Tuesday, 17 December 2013
Mum & Dad
Silky crush ribbon and snowflake embellishment are from Chloe's. I used 'invisible' mending thread to sew the snowflake on to the ribbon as it's quite heavy.
The bird/ bauble laser-cut is from Hobbycraft. I wasn't sure if I liked the original off-white colour so smooshed a Versamark ink-pad over one and added some gold embossing powder.
I then tried another version that used two coats of ink and powder to see if I could get a smoother finish, this worked except the laser-cut lost a little bit of definition.
The scallop die is Spellbinders and the alpha is Sizzix Script.
The card is 8 x 8 inches.
Labels:
Christmas,
die-cut,
Hobbycraft,
Sizzix alphabet,
Spellbinders
Thursday, 12 December 2013
Lili
Very simple one today, I'm busy with Christmas stuff.
At some point this will get a sentiment stuck on, image is Lili Of The Valley.
Tuesday, 10 December 2013
Sunday, 8 December 2013
Tuesday, 3 December 2013
Merry
Last week at card club someone casually mentioned they would be going to visit a mutual friend. I asked if they would be going before Christmas and they replied "Yes, but if want me to take a card then you'll need to give me it today".
I literally had minutes to design and make a card, with what I had with me, hate being put on the spot like that!
This was the very quick card that I threw together. The holly die is an old Sizzix one and the sentiment is by Papertrey Ink. The sentiment has been cut twice and layered up to add some depth.
I thought it was quite good for an 'instant' card but had a couple of comments along the lines of "Why are you just putting merry?"
Well that's because I don't have a Christmas die....
When I got home, with more supplies, I decided to make the same card but this time to add some glitter (the first one is glazed with Glossy Accents).
Then made a landscape version and went mad and added a peel-off, woohooo.
Sunday, 1 December 2013
Advent Calendar
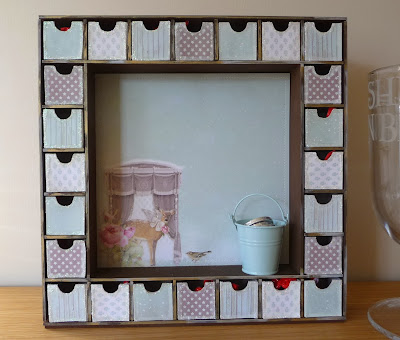
I bought this Kaisercraft advent calendar kit months ago.
I think it was September before I took it out of the packet, then took ages painting it all. The instructions I read said it would need two coats but I gave it three and still wasn't happy with the finish (but was extremely bored of painting by then)
Assembly was straight-forward enough but I was concerned as to whether the MDF would have swollen with the paint and then not fit properly.
After all this I read a blog post where someone suggested assembling it all first and then simply spray painting the whole lot....yeah, wish I'd read that before I started!
The calendar had been sitting about for a few weeks because, although I'd painted it dark brown, I had no idea how to decorate it.
I was hoping that the shops would start getting their Christmas decorations in and that it would inspire me.
Then, last week I realised it was December 1st (today) and that I needed to crack on else there would be no point at all in having an advent calendar.
I am a fan of the Tilda range of papers so eventually decided to use a combination in duck-egg/ brown.
I'm ashamed to say the calendar is still not complete but I have put some chocolates in anyway and it is nearly done ...
I need to number all the boxes (but don't like the huge numbers that come with the kit) and also I want to do something with the big area in the middle.
Maybe by next Christmas I'll have it done :)
Thursday, 28 November 2013
Merry
Oh the games I had making this card!
I had an idea that I would cut a circular aperture in the front of a card. Then I was going to frame it using a scalloped die-cut. So I used the largest die from my set of Nesties to cut the aperture and then discovered that I couldn't cut a scalloped frame because the scallop circle Nesties aren't big enough, I ended up with lots of little pieces and not much else. What I should have done was cut a smaller circle in the first place but hey-ho.
I now had a card with a large circular aperture but it needed some sort of definition round the hole. I used Versamark ink to coat the actual die, lined it up carefully with the hole, and passed it through the Cuttlebug again, then quickly sprinkled with gold embossing powder.
If I'd known previously what I needed to do I would have inked the die before making the aperture, it would have done it in the one step instead of having to re-line it up etc and maybe given a neater finish.
All that done I cut the landscape piece using pearlescent white card and attached to the back of the aperture. This means I can write the greeting on the inner left side.
The card still needed something else. I decided to use some Frantage chunky white embossing enamel to mimic falling snow.
I sprinkled a small amount directly on to the card and heated from underneath (you don't need to use ink with this).
Lastly, stamped 'Merry' using a SU stamp and matching tag punch, and tied some gold elastic round the spine.
Labels:
Christmas,
Country Landscape,
Frantage,
Memory Box,
Spellbinders,
Stampin Up
Monday, 25 November 2013
Birthday Wishes
Another Lili of the Valley image
Dies are Spellbinders
Stamp by Waltzingmouse
I've added some pink tulle behind the die-cuts
Labels:
Birthday,
Lili Of The Valley,
Spellbinders,
Waltzingmouse
Saturday, 23 November 2013
Flowers
Image is by Lili Of The Valley -- they do pads of thirty for £6, free p&p. Most of them are cute-style but I spotted this flower theme one too. They are printed on nice quality cardstock and the colours are bright and clear, only works out at 20p per image.
Sentiment is by Waltzingmouse
Dies are all Spellbinders
I coloured white self-adhesive gems with Copics
Papers are DCWV
Labels:
general,
Lili Of The Valley,
Spellbinders,
Waltzingmouse
Thursday, 21 November 2013
Birthday
Image is Lili Of The Valley, paper is Papermania
Sentiment and punch are Stampin' Up!
Corner die is Sizzix
Labels:
Birthday,
Lili Of The Valley,
Papermania,
Sizzix die-cut,
Stampin Up
Monday, 18 November 2013
Saturday, 16 November 2013
Christmas
I haven't been posting much because most of the cards I have made recently have been very similar to what I've already shown.
Card above is the same as the last post except for different colour.
This one's 8" x 8", the central piece is recycled from an old card and I added the hand-written sentiment
These are Kaisercraft panels, again very similar to previous postings.
Next post I will have something different I promise.
Wednesday, 13 November 2013
Vintage
'Photo' is by Marianne
Embossing folder is Papermania
Dies are Memory Box
Sentiment is Craftwork Cards
Labels:
Christmas,
Craftwork Cards,
Marianne,
Memory Box,
Papermania
Sunday, 10 November 2013
Christmas
Sticker is K&Co (extremely old)
Sentiment stamp is Woodware but annoyingly half of the words are incomplete on the bottom row and I didn't realise until after I'd stamped it so had to try and rectify with a fine pen.
Embossing folder is Cuttlebug
Sunday, 3 November 2013
80
Made for a wonderful lady at my card club who loves purple and is celebrating a special birthday. She's taking it easy on the day itself by skipping off to New York for some shopping...hope I'm doing the same at that age!
I've used Nestabilities labels 22 to make the easel part. Basically you stagger the cutting plates on your Cuttlebug/ Big Shot so that only half the die actually cuts, then use the next size down and cut the complete die.
The '80' is really the only number that will work (apart from 88) for the 3D effect because you need to have die-cuts that are absolutely symmetrical. So if it wasn't 80 then I would have used butterflies or flowers or similar.
I cut three of each number and folded them in half (which is why they need to be symmetrical) then the first half of the first piece is glued to the first half of the second piece, the second half of the second piece is glued to the first half of the third piece. At this point I attached a length of 'invisible' cotton, and then glued the second half of the third piece to the second half of the first piece.
That all sounds a bit confusing but it's very simple to do, I promise.
The other end of the cotton was attached to the top of the easel and then a second die-cut (the gold frame) adhered to the card.
Border punch is Martha Stewart
Swirl die-cut is Riviera Corner by Memory Box
Sentiment is by Craftwork Cards
Friday, 1 November 2013
40
Spotty panel is Theresa Collins
Paper is Tilda
I've edged the tag with a Krylon pen (went through a phase about six years ago where I Kryloned everything, then forgot all about the pens, but pleased to say they haven't dried up and still work!)
The '40' is Sizzix Block Party alpha, I cut six lots of each number from cardstock then layered them up, to make faux-chipboard. The top layer was glazed with Glossy Accents and whilst still wet was sprinkled with Glamour Dust.
 |
| (ribbon is straight in real life!) |
Wednesday, 30 October 2013
December
'December' panel is Kaisercraft
Sentiment, Craftwork Cards
Die, Memory Box
The green cardstock looked a little bland so I stamped (medallion stamp by Stampin' Up!) using Versamark and clear embossing powder.
Labels:
Christmas,
Craftwork Cards,
heat embossing,
Kaisercraft,
Memory Box,
Stampin Up
Sunday, 27 October 2013
Merry Christmas
Paper and small panel are Kaisercraft
Sentiment stamp was a magazine freebie
Brad is from an old Papermania kit
I roughly edged the card with Versamark and gold embossing powder.
Subscribe to:
Comments (Atom)


